Job
Jobs are how the player earns money in Derail Valley, with said income being used to pay off fees and buy licenses to take more risky and lucrative jobs. Jobs come in three different varieties: Freight Hauls, Logistic Hauls, and Shunting. Completing a job under a certain time will provide the player with extra money via a time bonus. During the execution of a job, fees start to accumulate as a cost of consumables used by engaged locomotives. The fees may increase further should the player cause any damage to their train, the cargo and the environment during the operation.
To activate a job, select one of the preview papers from the table in a station office and insert it in the job validator. Job preview paper consist of only one page with "To accept: insert into job validator" sentence in the right bottom corner. The validator will then give you a booklet detailing the job's steps to completion, plate numbers of the cars you need to move, and siding numbers that cars need to be brought to and from. Job booklet has a brown cover and consist of several pages. To finish a job, complete all the prerequisite steps, then insert the booklet into the job validator. If all prerequisite steps are completed properly (includes tying a handbrake on 1 car in the consist), job validator will return a report containing short summary of the job and a payment in cash, otherwise the validator will instead provide a status report on the job, including what steps have been completed and how much time has elapsed so far.
Avoid taking job preview papers outside of a station area, otherwise it will be rejected by the job validator should you come back and submit said job. Job preview papers also cannot be taken from one station and submitted to another station's validator. Booklets meanwhile can be submitted for completion to the validator at any station.
All jobs have a unique job ID, which consists of the abbreviated name of the originating station, the abbreviation for the job type, and a two digit numerical ID, separated by dashes. This job ID is visible on the preview paper for the job, the job booklet, and the info plates of the cars associated with the job.
All consists of cars, locomotives and available jobs are spawned upon the player enter the station. When player go out of the station range, all consists of cars and respective job preview papers that not been claimed are going to despawn immediately, whereas consists claimed by the player or any other cars coupled to recently used locomotives will stay there up to two hours in-game time. After that time limit, it will also despawn.
Claiming a job through the job validator causes reservation to siding track at the destination station, so there is always enough room for cars that the player has to deliver. It also reduce a number of jobs that can be spawned at the destination station.
Any job can be abandoned if for some reason the player decide that. In order to cancel a job in progress, respective job booklet has to be discarded into trash bin at any station office or into a dumpster outside. There is no penalty for canceling the job and the respective consist of cars will despawn.
Job types
Freight Haul
Freight Hauls are the primary type of delivery job, asking players to deliver cars loaded with cargo from one station to another. They are the only type of job unlocked at the beginning of the game, and their job preview papers are marked with a green heading.
Freight Hauls consist of gathering loaded cars from an outbound track (track ID ending in O), and hauling them to an inbound track (track ID ending in I) at another station. These generally have the highest payout of all job variants, but also can be quite heavy, meaning one must be sure their locomotive is capable of pulling the weight.
Freight Hauls can be generated by completing loading shunting jobs at a station. Freight Hauls also always generate a shunting job to unload the train at the destination station upon completion.
Logistic Haul
Logistic Hauls are a secondary type of delivery job, also asking players to deliver cars from one station to another, but, unlike Freight Hauls, they have players haul empty cars. They require the Logistic Haul license, which costs $20,000. Their job preview papers have a yellow heading.
Logistic Hauls have players collect empty cars from a shunting track (track ID ending in S) at one station, and deliver them to a shunting track at another station. They can be thought of as "returning" empty cars to where they came from (or at least to another station that can use them). Thus they often have different, and more varied, routes than Freight Hauls. Logistic Hauls typically pay less than Freight Hauls, but they are also have much lighter weights, and thus can easily be combined with a freight haul to earn some extra money.
Logistic Hauls will sometimes ask players to deliver cars to a track that already has some cars on it; however, there will always be enough room on the track for the cars to fit, although it may require shifting the cars already there.
Unlike the other kinds of jobs, Logistic Hauls currently do not generate a follow-up job on completion.
Shunting
Unlike the other two kinds of jobs, shunting jobs require players to move cars around within the station they are already at. They require the Shunting license, which costs $1,000. Their job preview papers are marked with a red heading.
Shunting jobs come in two types: loading jobs and unloading jobs.
Loading jobs require the player to collect cars from shunting tracks at the station, sometimes requiring the player to collect cars from multiple tracks and couple them together (the number of pick-up locations is listed on the preview paper), load them at a loading track (track ID ending in L), and then park those loaded cars on an outbound track at the same station. On completion, loading jobs generate a Freight Haul job to haul the assembled train to another station; the destination of this Freight Haul is listed on the Shunting job's preview paper, allowing players to select loading jobs specifically for the Freight Haul jobs they will create.
Unloading jobs require the player to collect loaded cars from an inbound track at a station, unload them at a loading track, and then park them at shunting tracks, sometimes requiring the player to split them into multiple consists and park each at a different track (the number of drop-off locations is listed on the preview paper). Unloading jobs are generated by delivering Freight Hauls, and upon completion, generate Logistic Haul jobs to transport the unloaded cars to another station, although the destination of these Logistic Hauls cannot be determined before completing the Shunting job.
Shunting jobs typically give less money than delivery jobs, but are usually quicker to complete, as they do not require traveling long distances across the map. They are also useful to generate more options for jobs headed to other stations.
As Shunting jobs take place entirely within the flat yards of stations, and require more precise maneuvering, it is recommended to use a small shunter-class locomotive for them, such as the DE2, the DM3, the S060, or the BE2 Microshunter. A Locomotive Remote is also useful to make coupling and switching easier.
Tips for swiftly completing a job
Completing a job under the printed time limit is a must, as it gives you additional cash for your work, which can be the difference between getting your next license or being swamped by fueling fees for the foreseeable future.
In the yard:
- Be ready to go before submitting a job to the validator. Have your locomotive hooked up to the consist you intend to pull so you can get moving the moment you grab the booklet.
- Have a plan on what you intend to do. If you think you might need a helper, take one, plus a locomotive remote to operate it, especially if you're going to be pulling a long train across the map.
- Make sure you have enough fuel to get you through the job. Paying service fees at the career manager will always give your locomotive a full resupply, or you can take what you need at a manual service depot.
- Car numbers and sidings are only revealed once you accept a job. Try to look for hints to what a job's consist might be, such as cargo type and car color, which are always shown on job preview papers even when the job has yet to be accepted, as well as the job number (top right of the job file), which can also be found on cars belonging to the job's consist.
On the line:
- Know what your locomotive is capable of pulling, and the terrain you're going to be dealing with.
- Keep an eye on your map and the speed signs along your route of choice, otherwise you risk being blindsided at speed by a sharp curve that can easily derail a car, or worse, the entire train.
- Make sure the switches are set. Going down the wrong line can waste valuable time and may even risk a derailment if you get redirected onto a sharp curve.
- Try to go as fast as you can, but leave room for when you want to coast or if a downhill grade is approaching.
- Remember how you set your switches last time you passed them. They may not be alligned with where you want to go this time.
- Don't be afraid to run ahead to see what's coming up. It may save you invaluable time and prevent a derailment, or let you pinpoint the track you need to travel on.
Gallery
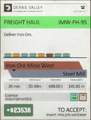
Freight Haul - job preview

Freight Haul - job booklet
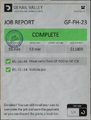
Freight Haul - job report upon completion

